
When people think of waxing, the first images that likely come to mind is underarm waxing or the silky smooth results that come as a result of Brazilian wax. While arm waxing may not be the first thing that comes to mind, Enso is happy to shed some light as to why waxing your arms should at least be on your radar.
Whether you're a seasoned waxing pro or a newcomer to the world of hair removal, this comprehensive guide will walk you through everything you need to know about how and why waxing your arms may be a great option for you!
Why should you consider waxing your arms?
For most new to the practice of waxing unwanted arm hair, there may be a lack of understanding as to why anyone would want to remove the hair covering their arms. For the most part, arm hair is socially accepted. So why do it?
Reasons for removing arm hair could be as simple as enjoying the feeling of soft, smooth skin on one of the most visible parts of our body. Others may feel uneasy or embarrassed about the look of thick, dark, arm hair and feel more comfortable when they do not have to consider the presence of their arm hair. Additionally, some choose to remove their arm hair for professional reasons – from swimmers to performers to cooks in a kitchen, the lack of arm hair makes a difference in some environments.
Is soft wax or hard wax better for arm waxing?
Generally, the choice between soft wax and hard wax is a personal preference, however, there can be instances where using one over the other will provide better results.

When it comes to hard wax, this method of hair removal is best suited for those with highly sensitive skin who still want to wax their body. While hard wax is most commonly recommended for use on smaller areas, it’s gentler on the skin making it the perfect choice for those with a low level pain tolerance or easily irritable skin.
Alternatively, soft wax is better for waxing larger areas of the body, making it a reliable choice for removing unwanted arm hair. Due to its ability to stick to the strands of hair and the top layer of skin, soft wax can also act as a mild exfoliant for smoother, softer skin.
How to prepare for arm waxing
Coming prepared to your appointment is not only beneficial for you, but it also makes the entire waxing process as simple and streamlined as possible. Chances are, if you’ve gotten any type of body waxing done previously you’re pretty much already prepared for what to expect during an arm waxing session. The process of cleaning the area, applying the wax, and removing the wax strip will stay the same.
For those who are not used to waxing services, we’ve outlined some important pieces of information that could potentially make or break your arm waxing experience:
Make sure your hair is grown out to a minimal length
In order for a wax to be successful, there is a minimum required length that hair has to be. If hair is too short, the wax will not be able to adequately bond to each strand. For best results, the golden rule is that any new growth must be at least a quarter of an inch long.
When clients choose to schedule a waxing appointment before the hair has reached the appropriate length, you can risk walking out of your wax session with patchy, uneven results. In addition to looking unfinished, there is an increased potential for ingrown hairs to develop underneath the skin. Your esthetician will most likely turn you away and make you reschedule your appointment for a few weeks out.
To ensure you get the best possible waxing experience, arrive at your appointment with at least a quarter inch of hair.
Exfoliate your arms 24 hours before waxing
Before any waxing service, it’s strongly recommended to exfoliate the area being serviced prior to your appointment. Exfoliation aids in removing the buildup of dirt, oil, and dead skin cells that may have accumulated on the surface of your skin. If this type of buildup is present, it can make the bonding to hair strands difficult for the freshly applied wax. In addition to making the waxing process as effective as possible, exfoliation is also a wonderful way to keep your skin healthy, refreshed, and ready for any regrowth, minimizing the potential for ingrown hairs.
While exfoliation is beneficial, it does need to be done at least 24 hours prior to the appointment. Protecting the integrity of your skin means exfoliating around 24 hours prior to your appointment.
Apply a pre-wax lotion or oil
 It doesn't matter if skin sensitivity or lusciously soft skin is at the forefront of your mind prior to your wax appointment. There are oils and lotions that your salon specialist will apply onto your skin as part of the prep process.
Both pre-wax oils and lotions create a barrier at the very surface level of your skin in order to not only protect it during the service, but also lock in moisture to keep the area being waxed refreshed.
What to expect from an arm waxing appointment
Chances are, if you’ve ever been waxed before, you’ll know exactly what to expect during an arm waxing service. Although the location of your wax may be different, the preparation and facilitation will be almost exactly the same.
There are a few different things to keep in mind in order to have a full understanding of what waxing entails. Variables such as whether your wax is being facilitated through a professional esthetician, or simply in the comfort of your own home is going to be one of the biggest factors.
At a professional waxing studio
Opting for the waxing services of a licensed professional can make all the difference. Instead of worrying yourself with proper precautions, cleanliness, and waxing technique, you can sit back, relax, and rely on the services that your esthetician provides.
The appointment will most likely begin with a small discussion surrounding any skincare concerns, as well as any previous waxing experience. Once all questions are answered, the wax specialist will begin preparing for the wax itself, cleaning off the area being treated and ensuring the wax is a suitable temperature.
Once everything is in place, the wax is applied with skill and intention before being rapidly removed. The application and removal of wax will be repeated until the entire area is serviced. Once finished, the esthetician will wipe down the area, cleansing the skin of any residual wax while simultaneously soothing any irritation. To finalize the service, your technician will provide personalized aftercare recommendations, as well as suggest custom products for your skin.
Steps to take if you’re waxing your arms at home
Although soliciting the help of a professional makes the waxing process simple and straightforward, it is by no means required. Thanks to the beauty industry, at-home waxing kits are made readily available for anyone looking to try the waxing experience from the comfort of their own home. These kits, painted with helpful instructional videos on the internet have made home waxing attainable for almost everyone.
Steps for waxing at home:
- Set up a clean environment to work at
- Use a gentle soap or cleanser to wash the area before patting it dry with a clean towel.
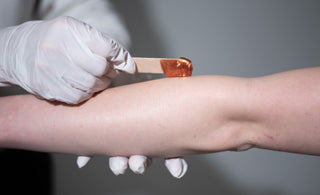
- Apply a thin layer of wax onto the arm, starting from the top, with the wax being applied in the same direction of hair growth. Be sure that the wax is not too liberally applied and be sure to work in manageable sections.
- If using soft wax, apply your removal strip on top of the section you just applied while the wax is still warm.
- If using hard wax, be sure that the wax has had sufficient time to fully cool before moving on to the next step.
- Once ready, hold the skin taut and swiftly pull the section of wax, moving in the direction opposite of hair growth, for best results. Try to keep a consistent speed and move parallel to the surface of the skin.
- Repeat the wax application and removal process until the entirety of the area has been treated.
- Once satisfied with the hair removal process, use a special post-wax formula to cleanse and care for the skin for best results.
How much does arm waxing usually cost?
The cost associated with waxing will heavily depend on whether or not you choose to wax at home or whether you choose to rely on the expertise of a professional. Additionally, costs can fluctuate further depending on location (state to state, city to city), as well as the skillset of the individual performing the wax. On average, customers can expect to spend anywhere between 25 to 55 dollars for an arm waxing service facilitated by a professional.
Best tips for arm waxing aftercare
It doesn't matter if the wax was carried out at home or through the services of a professional, it is essential to follow the proper aftercare recommendations in order to achieve the best possible results. Failure to properly care for your skin following a wax could result in something as simple as irritation, or as serious as infection.
Use post-wax lotion or another calming product
The first, and arguably easiest step, is to ensure that you have some sort of cooling or calming product on hand for irritated skin. While post-wax lotions are both high quality and effective in calming the skin, products such as unscented lotions and aloe vera can also be used to keep your skin happy.
Failure to supplement the skin with some sort of soothing lotion or hydrating product can leave the skin dry and red. The key to rejuvenated skin is to maintain hydrating both inside and out!
Keep your arms away from direct sunlight for a bit
Since waxing can be exfoliating in nature, it is considered best practice to avoid direct sunlight for at least 24 hours following your waxing appointment. The last thing your newly waxed skin needs is a sunburn!
Begin a routine of exfoliation and moisturizing 48 hours after waxing
Lastly, in order to make sure that your skin winds up looking its best while also preparing your skin for new hair growth, it is highly recommended to start a regular schedule of moisturizing and exfoliating. Both of these will minimize the likelihood for the development of ingrown hairs.
Enso has everything you need for a successful arm waxing session!
Here at Enso, we’re all about waxing! Our passion guides us daily to help waxing professionals and waxing enthusiasts alike to love and care for hair-free skin. WIth expert advice and the best products available, Enso is your primary resource for all things waxing. Visit our website to learn more and see all that we have to offer!